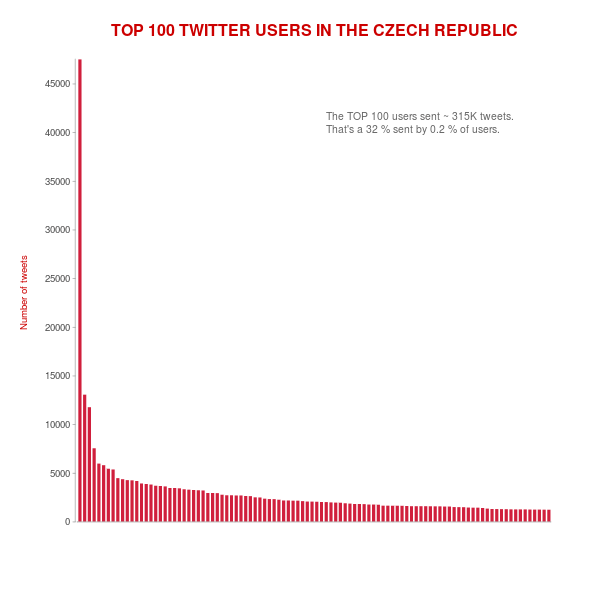
Last time I described the setup of my OpenShift Twitter crawler and let it running and downloading data. It’s been more than two months since I started and I got interesting amount of data. I also made a simple ETL process to load it into my local PostGIS database, which I’d like to cover in this post.
Extract data
Each day is written to the separate sqlite file with a name like tw_day_D_M_YYYY. Bash is used to gzip all the files before downloading them from OpenShift.
#!/bin/bash

ssh openshift << EOF
    cd app-root/data
    tar czf twitter.tar.gz *.db
EOF

scp openshift:/var/lib/openshift/55e487587628e1280b0000a9/app-root/data/twitter.tar.gz ./data
cd data &&
tar -xzf twitter.tar.gz &&
cd -

echo "Extract done"
Transform data
The transformation part operates on downloaded files and merges them into one big CSV file. That’s pretty straightforward. Note that’s quite simple with sqlite flags, some sed and tail commands.
#!/bin/bash

rm -rf ./data/csv
mkdir ./data/csv

for db in ./data/*.db; do
    FILENAME=$(basename $db)
    DBNAME=${FILENAME%%.db}
    CSVNAME=$DBNAME.csv
    echo "$DBNAME to csv..."
    sqlite3 -header -csv $db "select * from $DBNAME;" > ./data/csv/$CSVNAME
done

cd ./data/csv
touch tweets.csv
echo $(sed -n 1p $(ls -d -1 *.csv | head -n 1)) > tweets.csv # get column names

for csv in tw_*.csv; do
    echo $csv
    tail -n +2 $csv >> tweets.csv # get all lines without the first one
done
Load data
In the last step, the data is loaded with SQL \copy command.
#!/bin/bash

export PG_USE_COPY=YES

DATABASE=mzi_dizertace
SCHEMA=dizertace
TABLE=tweets

psql $DATABASE << EOF
    DROP TABLE IF EXISTS $SCHEMA.$TABLE;
    CREATE UNLOGGED TABLE $SCHEMA.$TABLE (id text, author text, author_id text, tweet text, created_at text, lon float, lat float, lang text);
    \copy $SCHEMA.$TABLE FROM 'data/csv/tweets.csv' CSV HEADER DELIMITER ','
    ALTER TABLE $SCHEMA.$TABLE ADD COLUMN wkb_geometry geometry(POINT, 4326);
    UPDATE $SCHEMA.$TABLE SET wkb_geometry = ST_SetSRID(ST_MakePoint(lon, lat), 4326);
    CREATE INDEX ${TABLE}_geom_idx ON $SCHEMA.$TABLE USING gist(wkb_geometry);
    COMMIT;
EOF
First statistics
Some interesting charts and numbers follow.


After a while I got back to my PostGIS open data case study. Last time I left it with clustering implemented, looking forward to incorporate Turf.js in the future. And the future is now. The code is still available on GitHub.
Subgroup clustering
Vozejkmap data is categorized based on the place type (banks, parking lots, pubs, …). One of the core features of map showing such data should be the easy way to turn these categories on and off.
As far as I know, it’s not trivial to do this with the standard Leaflet library. Extending L.control.layers and implement its addOverlay, removeOverlay methods on your own might be the way to add needed behavior. Fortunately, there’s an easier option thanks to Leaflet.FeatureGroup.SubGroup that can handle such use case and is really straightforward. See the code below.
cluster = L.markerClusterGroup({
    chunkedLoading: true,
    chunkInterval: 500
});

cluster.addTo(map);

...

for (var category in categories) {
    // just use L.featureGroup.subGroup instead of L.layerGroup or L.featureGroup
    overlays[my.Style.set(category).type] = L.featureGroup.subGroup(cluster, categories[category]);
}

mapkey = L.control.layers(null, overlays).addTo(map);
With this piece of code you get a map key with checkboxes for all the categories, yet they’re still kept in the single cluster on the map. Brilliant!

Using Turf.js for analysis
Turf is one of those libraries I get amazed easily with, spending a week trying to find a use case, finally putting it aside with “I’ll get back to it later”. I usually don’t. This time it’s different.
I use Turf to get the nearest neighbor for any marker on click. My first try ended up with the same marker being the result as it was a member of a feature collection passed to turf.nearest() method. After snooping around the docs I found turf.remove() method that can filter GeoJSON based on key-value pair.
Another handy function is turf.distance() that gives you distance between two points. The code below adds an information about the nearest point and its distance into the popup.
// data is a geojson feature collection
json = L.geoJson(data, {
    onEachFeature: function(feature, layer) {
        layer.on("click", function(e) {
            var nearest = turf.nearest(layer.toGeoJSON(), turf.remove(data, "title", feature.properties.title)),
                distance = turf.distance(layer.toGeoJSON(), nearest, "kilometers").toPrecision(2),
                popup = L.popup({offset: [0, -35]}).setLatLng(e.latlng),
                content = L.Util.template(
                    "<h1>{title}</h1><p>{description}</p> \
                    <p>Nejbližší bod: {nearest} je {distance} km daleko.</p>", {
                    title: feature.properties.title,
                    description: feature.properties.description,
                    nearest: nearest.properties.title,
                    distance: distance
                });

            popup.setContent(content);
            popup.openOn(map);

            ...
From what I’ve tried so far, Turf seems to be incredibly fast and easy to use. I’ll try to find the nearest point for any of the categories, that could take Turf some time.
Update
Turf is blazing fast! I’ve implemented nearest point for each of the categories and it gets done in a blink of an eye. Some screenshots below. Geolocation implemented as well.
 You can locate the point easily.
 You can hide the infobox.
 You can jump to any of the nearest places.
More than a year ago I wrote about analyzing Twitter languages with Streaming API. Back then I kept my laptop running for a week to download data. Not a comfortable way, especially if you decide to get more data. One year uptime doesn’t sound like anything you want to be part of. OpenShift by Red Hat seems to be almost perfect replacement. Almost.
OpenShift setup
I started with Node.js application running on one small gear. Once running, you can easily git push the code to your OpenShift repo and login via SSH. I quickly found simple copy-pasting my local solution wasn’t going to work. and fixed it with some minor tweaks. That’s where the fun begins…
I based the downloader on Node.js a year ago. Until now I still don’t get how that piece of software works. Frankly, I don’t really care as long as it works.
Pitfalls
If your application doesn’t generate any traffic, OpenShift turns it off. It wakes up once someone visits again. I had no idea about that and spent some time trying to stop that behavior. Obviously, I could have scheduled a cron job on my laptop pinging it every now and then. Luckily, OpenShift can run cron jobs itself. All you need is to embed a cron cartridge into the running application (and install a bunch of ruby dependencies beforehand).
rhc cartridge add cron-1.4 -a app-name
Then create .openshift/cron/{hourly,daily,weekly,monthly} folder in the git repository and put your script running a simple curl command into one of those.
curl http://social-zimmi.rhcloud.com > /dev/null
Another problem was just around the corner. Once in a while, the app stopped writing data to the database without saying a word. What helped was restarting it - the only automatic way to do so being a git push command. Sadly, I haven’t found a way to restart the app from within itself; it probably can’t be done.
When you git push, the gear stops, builds, deploys and restarts the app. By using hot deployment you can minimize the downtime. Just put the hot_deploy file into .openshift/markers folder.
git commit --allow-empty -m "Restart gear" && git push
This solved the problem until I realize that every restart deleted all the data collected so far. If your data are to stay safe and sound, save them in process.env.OPENSHIFT_DATA_DIR (which is app-root/data).
Anacron to the rescue
How do you push an empty commit once a day? With cron of course. Even better, anacron.
mkdir ~/.anacron
cd ~/.anacron
mkdir cron.daily cron.weekly cron.monthly spool etc

cat <<EOT > ~/.anacron/etc/anacrontab

SHELL=/bin/sh
PATH=/usr/local/sbin:/usr/local/bin:/sbin:/bin:/usr/sbin:/usr/bin:/$HOME/bin
HOME=$HOME
LOGNAME=$USER

1 5  daily-cron nice run-parts --report $HOME/.anacron/cron.daily
7 10 weekly-cron nice run-parts --report $HOME/.anacron/cron.weekly
@monthly 15 monthly-cron nice run-parts --report $HOME/.anacron/cron.monthly

EOT

cat <<EOT >> ~/.zprofile # I use zsh shell
rm -f $HOME/.anacron/anacron.log
/usr/sbin/anacron -t /home/zimmi/.anacron/etc/anacrontab -S /home/zimmi/.anacron/spool &> /home/zimmi/.anacron/anacron.log

EOT
Anacron is to laptop what cron is to 24/7 running server. It just runs automatic jobs when the laptop is running. If it’s not and the job should be run, it runs it once the OS boots. Brilliant idea.
It runs the following code for me to keep the app writing data to the database.
#!/bin/bash

workdir='/home/zimmi/documents/zimmi/dizertace/social'
logfile=$workdir/restart-gear.log
date > $logfile

{
HOME=/home/zimmi
cd $workdir && \
git merge origin/master && \
git commit --allow-empty -m "Restart gear" && \
git push && \
echo "Success" ;
} >> $logfile 2>&1
UPDATE: Spent a long time debugging the “Permission denied (publickey).”-like errors. What seems to help is:
- Use id_rsa instead of any other SSH key
- Put a new entry into the
~/.ssh/config file
I don’t know which one did the magic though.
I’ve been harvesting Twitter for a month with about 10-15K tweets a day (only interested in the Czech Republic).
1⁄6 to 1⁄5 of them is located with latitude and longitude. More on this next time.
I’ve seen a bunch of questions on GIS StackExchange recently related to SFCGAL extension for PostGIS 2.2. Great news are it can be installed with one simple query CREATE EXTENSION postgis_sfcgal. Not so great news are you have to compile it from source for Ubuntu-based OS (14.04) as recent versions of required packages are not available in the repositories.
I tested my solution on elementary OS 0.3.1 based on Ubuntu 14.04. And it works! It installs PostgreSQL 9.4 from repositories together with GDAL and GEOS and some other libs PostGIS depends on. PostGIS itself, CGAL, Boost, MPFR and GMP are built from source.
Here comes the code (commented where needed).
sudo -i
echo "deb http://apt.postgresql.org/pub/repos/apt/ trusty-pgdg main" | tee -a /etc/apt/sources.list
wget --quiet -O - https://www.postgresql.org/media/keys/ACCC4CF8.asc | sudo apt-key add -
apt-get update
apt-get install -y postgresql-9.4 \
    postgresql-client-9.4 \
    postgresql-contrib-9.4 \
    libpq-dev \
    postgresql-server-dev-9.4 \
    build-essential \
    libgeos-c1 \
    libgdal-dev \
    libproj-dev \
    libjson0-dev \
    libxml2-dev \
    libxml2-utils \
    xsltproc \
    docbook-xsl \
    docbook-mathml \
    cmake \
    gcc \
    m4 \
    icu-devtools

exit # leave root otherwise postgis will choke

cd /tmp
touch download.txt
cat <<EOT >> download.txt
https://gmplib.org/download/gmp/gmp-6.0.0a.tar.bz2
https://github.com/Oslandia/SFCGAL/archive/v1.2.0.tar.gz
http://www.mpfr.org/mpfr-current/mpfr-3.1.3.tar.gz
http://downloads.sourceforge.net/project/boost/boost/1.59.0/boost_1_59_0.tar.gz
https://github.com/CGAL/cgal/archive/releases/CGAL-4.6.3.tar.gz
http://download.osgeo.org/postgis/source/postgis-2.2.0.tar.gz

EOT

cat download.txt | xargs -n 1 -P 8 wget # make wget a little bit faster

tar xjf gmp-6.0.0a.tar.bz2
tar xzf mpfr-3.1.3.tar.gz
tar xzf v1.2.0.tar.gz
tar xzf boost_1_59_0.tar.gz
tar xzf CGAL-4.6.3.tar.gz
tar xzf postgis-2.2.0.tar.gz

CORES=$(nproc)

if [[ $CORES > 1 ]]; then
    CORES=$(expr $CORES - 1) # be nice to your PC
fi

cd gmp-6.0.0
./configure && make -j $CORES && sudo make -j $CORES install

cd ..
cd mpfr-3.1.3
./configure && make -j $CORES && sudo make -j $CORES install

cd ..
cd boost_1_59_0
./bootstrap.sh --prefix=/usr/local --with-libraries=all && sudo ./b2 install # there might be some warnings along the way, don't panic
echo "/usr/local/lib" | sudo tee /etc/ld.so.conf.d/boost.conf
sudo ldconfig

cd ..
cd cgal-releases-CGAL-4.6.3
cmake . && make -j $CORES && sudo make -j $CORES install

cd ..
cd SFCGAL-1.2.0/
cmake . && make -j $CORES && sudo make -j $CORES install

cd ..
cd postgis-2.2.0
./configure \
    --with-geosconfig=/usr/bin/geos-config \
    --with-xml2config=/usr/bin/xml2-config \
    --with-projdir=/usr/share/proj \
    --with-libiconv=/usr/bin \
    --with-jsondir=/usr/include/json \
    --with-gdalconfig=/usr/bin/gdal-config \
    --with-raster \
    --with-topology \
    --with-sfcgal=/usr/local/bin/sfcgal-config && \
make && make cheatsheets && sudo make install # deliberately one CPU only

sudo -u postgres psql
sudo -u postgres createdb spatial_template
sudo -u postgres psql -d spatial_template -c "CREATE EXTENSION postgis;"
sudo -u postgres psql -d spatial_template -c "CREATE EXTENSION postgis_topology;"
sudo -u postgres psql -d spatial_template -c "CREATE EXTENSION postgis_sfcgal;"
sudo -u postgres psql -d spatial_template -c "SELECT postgis_full_version();"
The Digital Elevation Model over Europe (EU-DEM) has been recently released for public usage at Copernicus Land Monitoring Services homepage. Strictly speaking, it is a digital surface model coming from weighted average of SRTM and ASTER GDEM with geographic accuracy of 25 m. Data are provided as GeoTIFF files projected in 1 degree by 1 degree tiles (projected to EPSG:3035), so they correspond to the SRTM naming convention.
If you can’t see the map to choose the data to download, make sure you’re not using HTTPS Everywhere or similar browser plugin.
I chose Austria to play with the data.
Obtaining the data
It’s so easy I doubt it’s even worth a word. Get zipped data with wget, extract them to a directory.
wget https://cws-download.eea.europa.eu/in-situ/eudem/eu-dem/EUD_CP-DEMS_4500025000-AA.rar -O dem.rar
unrar dem.rar -d copernicus
cd copernicus
Hillshade and color relief
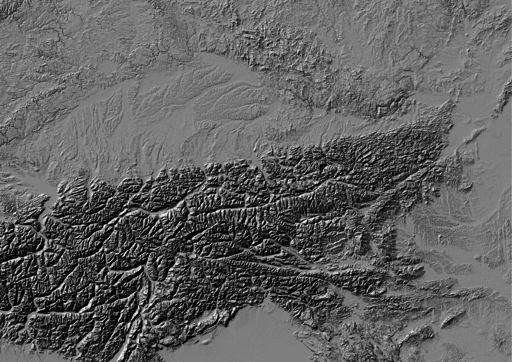
Use GDAL to create hillshade with a simple command. No need to use -s flag to convert units, it already comes in meters. Exaggerate heights a bit with -z flag.
gdaldem hillshade EUD_CP-DEMS_4500025000-AA.tif hillshade.tif -z 3
And here comes the Alps.

To create a color relief you need a ramp of heights with colors. “The Development and Rationale of Cross-blended Hypsometric Tints” by T. Patterson and B. Jenny is a great read on hypsometric tints. They also give advice on what colors to choose in different environments (see the table at the last page of the article). I settled for warm humid color values.
| Elevation [m] |
Red |
Green |
Blue |
| 5000 |
220 |
220 |
220 |
| 4000 |
212 |
207 |
204 |
| 3000 |
212 |
193 |
179 |
| 2000 |
212 |
184 |
163 |
| 1000 |
212 |
201 |
180 |
| 600 |
169 |
192 |
166 |
| 200 |
134 |
184 |
159 |
| 50 |
120 |
172 |
149 |
| 0 |
114 |
164 |
141 |
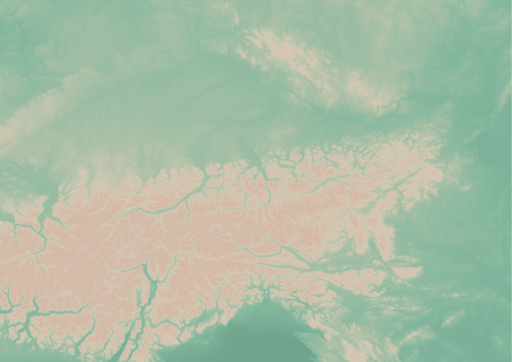
I created a color relief with another GDAL command.
gdaldem color-relief EUD_CP-DEMS_4500025000-AA.tif ramp_humid.txt color_relief.tif
And here comes hypsometric tints.

Add a bit of compression and some overviews to make it smaller and load faster.
gdal_translate -of GTiff -co TILED=YES -co COMPRESS=DEFLATE color_relief.tif color_relief.compress.tif
gdal_translate -of GTiff -co TILED=YES -co COMPRESS=DEFLATE hillshade.tif hillshade.compress.tif
rm color_relief.tif
rm hillshade.tif
mv color_relief.compress.tif color_relief.tif
mv hillshade.compress.tif hillshade.tif
gdaladdo color_relief.tif 2 4 8 16
gdaladdo hillshade.tif 2 4 8 16
Map composition
I chose Austria for its excessive amount of freely available datasets. What I didn’t take into consideration was my lack of knowledge when it comes to German (#fail). States come from data.gv.at and was dissolved from smaller administrative units. State capitals were downloaded from naturalearth.com.

I’d like to add some more thematic layers in the future. And translate the map to English.
Few words on INSPIRE Geoportal
INSPIRE Geoportal should be the first place you go to search for European spatial data (at last EU thinks so). I used it to find data for this map and it was a very frustrating experience. It was actually more frustrating than using Austrian open data portal in German. Last news are from May 21, 2015, but the whole site looks and feels like deep 90s or early 2000 at least.


 You can locate the point easily.
 You can hide the infobox.
 You can jump to any of the nearest places.

